Purpose
The Consignment Management feature enables complete management of consigned
inventories. This feature allows the setup of unlimited, segregated inventories.
Your organization will have the ability to automatically process the consignor/consignee
split based upon either net or gross values. Reports are available to
view consignment balances, sales, and various other statistics.
Procedure
- Create
a New Consignment Warehouse Record
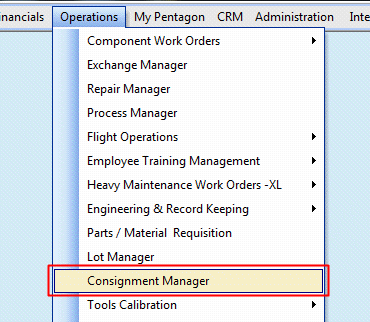
- Left-click Operations from
the home screen toolbar.
- Left-click Consignment
Manager.
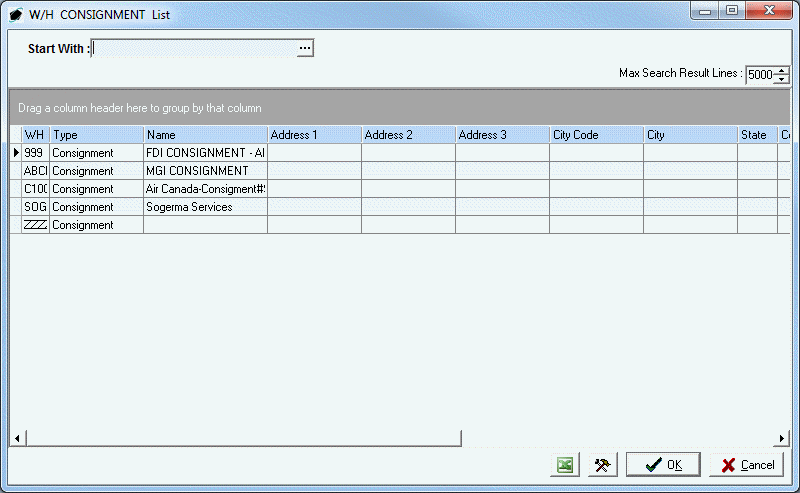
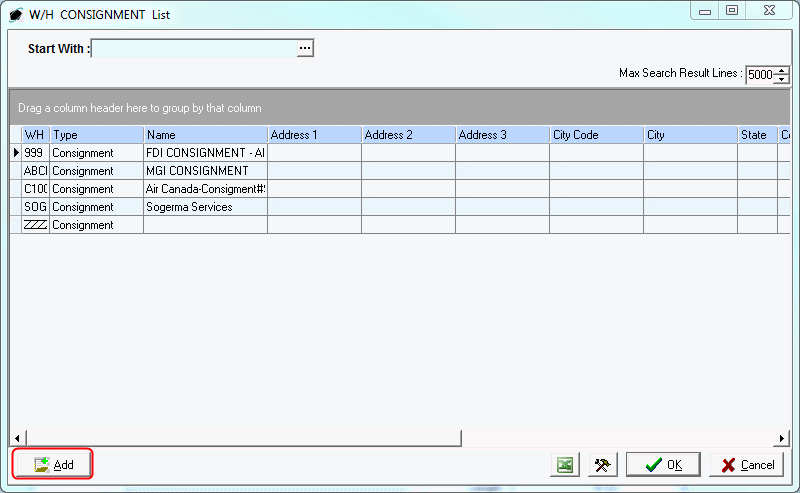
- The W/H CONSIGNMENT List search
window will appear. Double-click on any existing warehouse.
- The Consignment Information
W/H: [x] window will appear. Left-click the Add button.
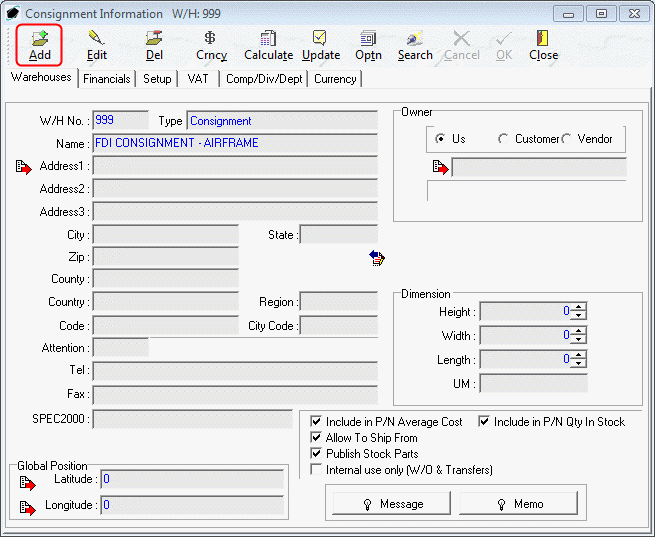
- The fields within the Consignment
Information W/H: [x] window will be cleared and the Type field
will display a value of "Consignment."
NOTE: The process for creating a new consignment
warehouse record can also be initiated in two other ways:
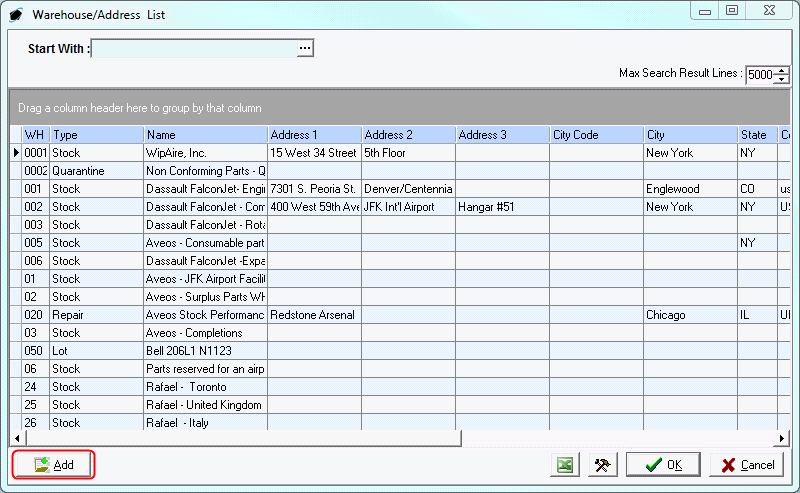
(1) by left-clicking Administration from
the home screen tool bar, go to Warehouses/Locations,
left-click W/H List.
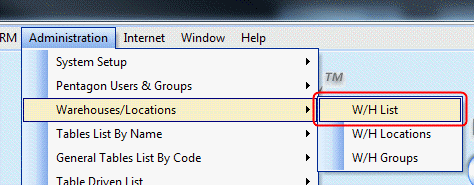
The Warehouse/Address List search window
will appear. Left-click the Add button.
(2) from the Consignment Information W/H: [x] window
left-click the Search button.

The W/H CONSIGNMENT List search window
will appear. Left-click the Add button.
- Consignment
Information Window Toolbar

- Add - Left-click this button to add
a new consignment warehouse record.
- Edit - Left-click this button to modify
the consignment warehouse record that is being displayed.
- Del (Delete) - Left-click this button
to delete the consignment warehouse record that is being displayed.
- Currency - As of Build 8.5.54.104, this button
may be ignored.
- Calculate - Left-click this button to update
the Total Consignment Sales and Consignment
Expensed Cost fields located on the Setup tab.
- Update - Left-click this button to update
the following:
- Line
cost of items issued from the consignment warehouse to component
and maintenance work orders.
- Line
cost of items from the consignment warehouse on pick tickets
and sales invoices.
- General
Ledger account associated with the line on which an item from
the consignment warehouse exists.
- Optn (Options) - Left-click this button
to view the Options menu.
- Search - Left-click this button to open the W/H
Consignment List search window.
- Cancel - Left-click this button to cancel any
changes to the consignment warehouse since last entering "Edit
Mode."
- OK - Left-click this button to accept
all changes to the consignment warehouse since last entering "Edit
Mode."
- Close - Left-click this button to close the Consignment
Information W/H: [x] window.
- Warehouses
Tab
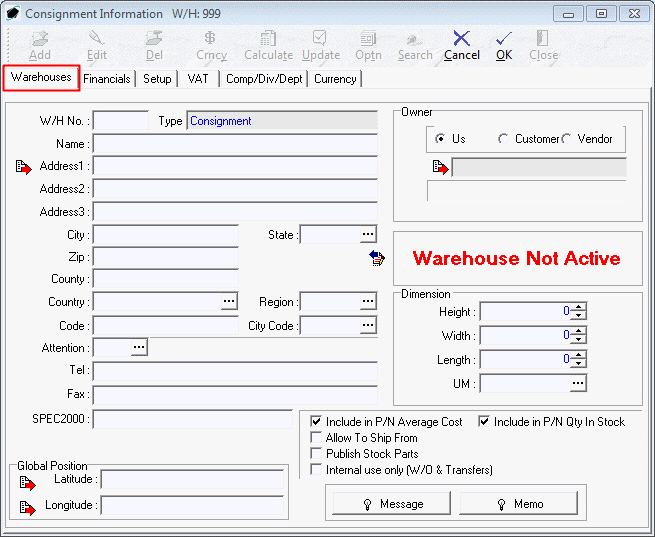
- Address Group Box
- W/H No -
Identify the code assigned to the consignment warehouse. This
field is mandatory and cannot be changed once the record is
created. [4-character limit]
- Type -
This field will automatically have a value of "Consignment"
NOTE: The Type field
cannot be changed in Consignment Manager. However, if the
consignment warehouse has been opened from the W/H
List (from the Administration menu
option), the Type may be changed from "Consignment"
to any other type.
- Name -
Enter the consignment warehouse name. [50-character limit]
- Address1, Address2,
and Address3 - Enter the consignment warehouse's
full address (including street, PO Box, suite number, apartment
number, etc.). [50-character limit per line]
- City -
Enter the consignment warehouse address city. [30-character
limit]
- State -
Identify the consignment warehouse address state.
NOTE: To
complete the State field, the appropriate state must
be listed in the State List. To access this
table, left-click Administration from the toolbar,
go to General Tables List by Code, and left-click State.
- Left-click
the ellipses
 in
the State field.
- The State
List search window will appear.
- Select the appropriate State (left-click
the line within the search screen and left-click OK;
or double-click the line within the search screen).
- ZIP - Enter the consignment
warehouse address ZIP Code. [10-character limit]
- County -
Enter the county in which the consignment warehouse address
is located (optional). [20-character limit]
- Country -
Identify the country in which the consignment warehouse address
is located (optional).
NOTE: To
complete the Country field, the appropriate country must
be listed in the Country List. To access
this table, left-click Administration from
the toolbar, go to Tables List by Name, and
left-click Country/Origin.
- Left-click
the ellipses
 in
the Country field.
- The Country List search
window will appear.
- Select
the appropriate Country (left-click the
line within the search screen and left-click OK;
or double-click the line within the search screen).
- Region -
Identify the region in which the consignment warehouse address
is located (optional).
NOTE: To
complete the Region field, the appropriate region must
be listed in the Region List. To access this
table, left-click Administration from the
toolbar, go to General Tables List by Code,
and left-click Region.
- Left-click
the ellipses
 in
the Region field.
- The Region List search
window will appear.
- Select
the appropriate Region (left-click the
line within the search screen and left-click OK;
or double-click the line within the search screen).
- Code -
This field may be used in order to identify the consignment
warehouse with a code that is different than the W/H
No. [10-character limit]
NOTE: The Code field
is for reference and custom reporting purposes only.
- City
Code - Identify the city (or airport) with which
the consignment warehouse location is associated (optional).
NOTE: To
complete the City Code field, the appropriate code must
be listed in the City Code List. To access
this table, left-click Administration from
the toolbar, go to Tables List by Name, and
left-click City & Airport Codes.
- Left-click
the ellipses
 in
the City Code field.
- The City
Code List search window will appear.
- Select
the appropriate code (left-click the line within the search
screen and left-click OK; or double-click
the line within the search screen).
- Attention -
Identify the individual responsible for the consignment warehouse
(optional).
NOTE: To
complete the Attention field, the appropriate
user must be listed in the Users List.
To access this table, left-click Administration from
the tool bar, go to Pentagon Users and Groups,
and left-click User List.
Steps for creating a user may be found in the procedure
"Creating a User" within the System Administration
section of this manual.
- Left-click
the ellipses
 in
the Attention field.
- The Users List search
window will appear.
- Select
the appropriate user (left-click the line within the search
screen and left-click OK; or double-click
the line within the search screen).
- Tel -
Enter the telephone number for the consignment warehouse.
[40-character limit]
- Fax -
Enter the fax number for the consignment warehouse. [40-character
limit]
- Global Position group
box
- Latitude - Identify the latitude of the consignment
warehouse address in decimal degrees format. (optional)
- Longitude - Identify the longitude of
the consignment warehouse address in decimal degrees format.
(optional)
- Owner group
box
- Owner
Type radio buttons - Identify the type of entity that owns
the inventory within the consignment warehouse.
- Us - Left-click
the radio button to the left of the Us label
to identify that the inventory within the consignment
warehouse is owned by your organization.
NOTE: The Owner is
not generally "Us" in the case of consignment.
- Customer - Left-click the radio button
to the left of the Customer label to
identify that the inventory within the consignment warehouse
is owned by a customer.
- Vendor - Left-click
the radio button to the left of the Vendor label
to identify that the inventory within the consignment
warehouse is owned by a vendor.
- Owner
account number - If Customer or Vendor is
selected in the Owner Type, select the customer or vendor
who owns the inventory within the consignment warehouse.
- Dimension group
box
- Height - Identify the height of the
consignment warehouse. The spinner arrows
 may
also be used to adjust the number in whole number increments.
- Width - Identify the height of the
consignment warehouse. The spinner arrows
 may
also be used to adjust the number in whole number increments.
- Length - Identify the length of the
consignment warehouse. The spinner arrows
 may
also be used to adjust the number in whole number increments.
- UM - Identify the
unit of measure in which the height, width, and length are
expressed.
NOTE: To
complete the unit of measure field, the appropriate unit
of measure must be listed in the UM List. To access
this table, left-click Administration from
the tool bar, go to Stock Tables List by Code,
and left-click Unit Measure (UM).
- Left-click
the ellipses
 in
the UM field.
- The UM
List search window will appear.
- Select
the appropriate unit of measure (left-click the line within
the search screen and left-click OK; or double-click
the line within the search screen).
- Attributes
group box
- Include in P/N Average
Cost check box - Mark the check box as "checked"
if the cost of items within the consignment warehouse
should be used to calculate the average cost in the part
master record.
NOTE: This
check box should be marked as "checked" unless
your organization does not want to include the cost of
items within the consignment warehouse in the
average cost of the part number in the parts master record.
- Include in P/N Qty
In Stock check box - Mark the check box as "checked"
if items within the consignment warehouse should be included
in the calculation for quantities in stock in the part
master record.
NOTE: This
check box should be marked as "checked" unless
your organization does not want to include quantities
of items in the consignment warehouse in the
quantities shown for the part number in the parts master
records.
- Allow To Ship From check
box - Mark the check box as "checked" if items
within the consignment warehouse should be allowed to
be issued to component or maintenance work orders, picked
on sales pick tickets, shipped on purchase shippers, or
transferred on warehouse transfers.
NOTE: This
check box should be marked as "checked" unless
the items within the consignment warehouse should
not be allowed to be issued, sold, or relocated.
- Publish
Stock Parts check
box - Mark the check box as "checked" if items
within the consignment warehouse should be included when
publishing your organizations parts to external databases.
- Internal use only (W/O
& Transfers) check box - Mark the check box
as "checked" if items within the consignment
warehouse should only be allowed to be issued to component
or maintenance work orders or transferred on warehouse
transfers.
NOTE: If
this check box is marked as "checked", items
within the consignment warehouse will be allowed
to be issued to component or maintenance work orders and
transferred on warehouse transfers regardless of the value
in the Allow To Ship From check box.
- Message
and Memo group box
- Message button
- Left-click
the Message button.
- The Memo
Editor window will appear. Left-click the Edit button
to add notes.
- Type
the message.
- Left-click
the OK button in the Memo
Editor window toolbar to save the message.
- When
the Message field is not blank, the
light bulb
 on
the appropriate button will be highlighted in yellow
 .
.
- Memo button
- Left-click
the Memo button.
- The Memo
Editor window will appear. Left-click the Edit button
to add notes.
- Type
the memo.
- Left-click
the OK button in the Memo
Editor window toolbar to save the memo.
- When
the Memo field is not blank, the
light bulb
 on
the appropriate button will be highlighted in yellow
 .
.
- Financials
Tab

NOTE: All
general ledger accounts and codes identified on the Financials tab
are defaults only. General ledger accounts and codes may be changed
on individual transactions.
- General
Ledger Accounts group box
- Sales GL Account -
Identify the general ledger account that should be associated
with the sales of items within the consignment warehouse.
NOTE: The Sales
GL Account identified within the consignment
warehouse will only be considered when transactions are posted
by line item.
- Purchasing GL Account -
Identify the general ledger account that should be associated
with the purchase of items received into the consignment warehouse.
NOTE: The Purchasing GL
Account identified within the consignment warehouse
will only be considered when transactions are posted by line
item.
- Update Line When Receiving check
box - Mark the check box as "checked" if general
ledger account on the line of purchasing documents should
be overwritten with the Purchasing GL Account identified
for the consignment warehouse.
NOTE: If
the Update Line When Receiving check box
is not marked as "checked", the general ledger account
associated with the line will not be affected by the Purchasing
GL Account identified for the consignment warehouse.
- W/H
Transfer GL Account -
Identify the general ledger account that should be associated
with the transfer of item from and to the consignment warehouse.
- Stock Quantity/Cost Update group
box.
NOTE: If
general ledger code defaults are not identified within the Stock
Quantity/Cost Update group box, then the general ledger
codes will be blank when new quantity and cost updates are created.
- GL
Code Debit -
Identify the general ledger code that should be debited in
quantity or cost updates to items within the consignment warehouse.
- GL
Code Credit -
Identify the general ledger code that should be credited in
quantity or cost updates to items within the consignment warehouse.
- Setup Tab
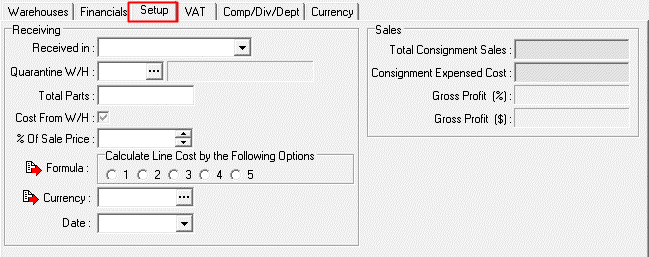
- Receiving
group box
- Received
in - Identify
the date that the consignment was received.
- Left-click
the drop down arrow
 in
the Received in field.
- The
date widget will appear.
- Left-click
the date that corresponds to the date on which the value
added tax registration will expire.
- Left-click
the OK button.
- Quarantine
W/H - Identify
the warehouse into which items from the consignment should
be received when received on an RMA.
- Total
Parts - Identify
the total quantity of items received.
- Cost from W/H check
box - Mark the check box as "checked" if your organization's
profit calculations are based upon the warehouse cost.
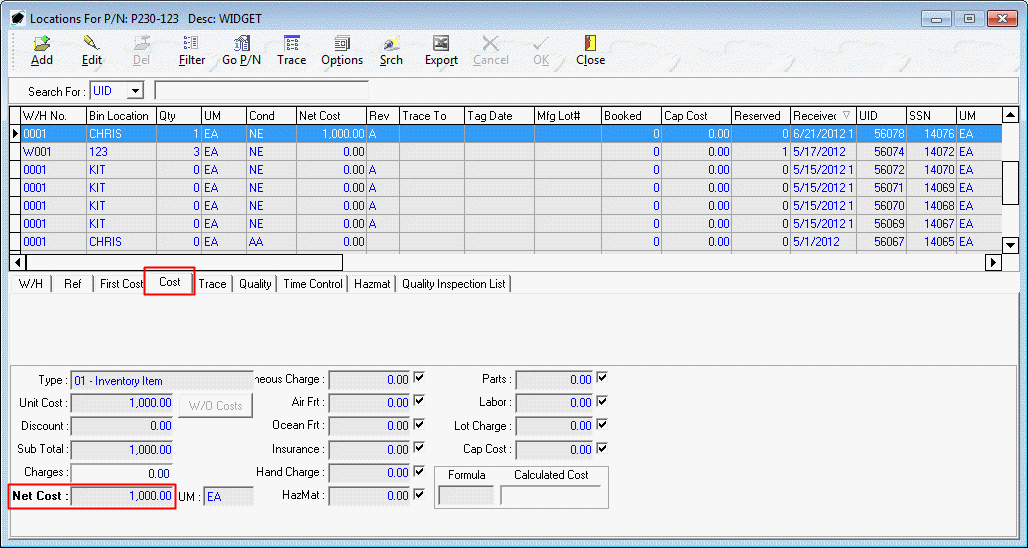
NOTE: "Warehouse
cost" can be viewed in the Net Cost field
of the Cost tab on the Locations
For P/N: [x] window.
- % Of Sale Price -
Identify the appropriate percentage based upon the option
that is selected in the Calculate Line Cost by the
Following Options group box (see below).
NOTE: The %
Of Sale Price field will not be active unless the Cost
From W/H check box is not marked as "checked."
- Calculate Line Cost by the
Following Options group box - Identify how your organization
calculates line cost for items within the consignment warehouse
by left-clicking the radio button that corresponds to the
formula your organization uses to calculate line cost.
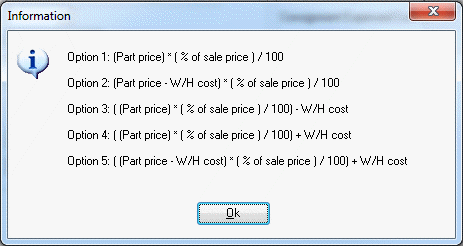
NOTE: The Information window
can be viewed by left-clicking the Formula label 
For all examples below: Part Price = $1,000, W/H Cost
= $400, % of Sale Price = 50%.
- Option 1 -
Cost is calculated as a percentage of the line sales price.
The % Of Sale Price field represents
the percentage of the line price that is considered cost.
[EXAMPLE] Cost
= $1,000 / 50% = $500
- Option 2 -
Cost is calculated as a percentage of the line sales price
after the warehouse cost has been subtracted from it.
The % Of Sale Price field represents
the percentage of the difference between the line price
and the warehouse cost that is considered cost.
[EXAMPLE] Cost
= ($1,000 - $400) / 50% = $300
- Option 3 -
Cost is calculated as a percentage of the line sales price
and then the warehouse cost is subtracted from it. The %
Of Sale Price field represents the percentage
of the line price from which the warehouse cost will be
subtracted; the result is considered cost.
[EXAMPLE] Cost
= ($1,000 / 50%) - $400 = $100
- Option 4 -
Cost is calculated as a percentage of the line sales price
and then the warehouse cost is added to it. The %
Of Sale Price field represents the percentage
of the line price to which the warehouse cost will be
added; the result is considered cost.
[EXAMPLE] Cost
= ($1,000 / 50%) + $400 = $900
- Option 5 - Cost
is calculated as a percentage of the line sales price
after the warehouse cost has been subtracted from it,
but then the warehouse cost is then added back into the
line cost. The % Of Sale Price field
represents the percentage of the difference between the
line price and the warehouse cost that is considered cost.
[EXAMPLE] Cost
= (($1,000 - $400)/50) + $400 = $700
- Currency - Identify
the currency in which the value of items in the consignment
warehouse is to be expressed.
NOTE: The
value of this field is relevant only if your organization
is utilizing the Multi-Currency Module. Instructions on the
use of the Multi-Currency module may be found in the procedure
"Multi-Currency Module" within the General System
section of this manual.
- Date - Identify
the date of the currency value.
NOTE: The
value of this field will be used to reference the appropriate
currency conversion rate so that actual costs may be reflected
in your organization's base currency.
The value of this field is relevant only if your organization
is utilizing the Multi-Currency Module and the Cost
From W/H check box is marked as "checked."
Instructions on the use of the Multi-Currency module may be
found in the procedure "Multi-Currency Module" within
the General System section of this manual.
- Sales group
box
- i. Total Consignment Sales - Displays the total price of
all items sold from the consignment warehouse.
- ii. Consignment Expensed Cost - Displays the calculated cost
of all items sold from the consignment warehouse.
- iii. Gross Profit (%) -
Displays the profit calculated by subtracting the calculated
cost of all items sold from the consignment warehouse from
the total price of all items sold from the consignment warehouse
divided by the total price of all items sold from the consignment
warehouse (Total Consignment Sales minus Consignment
Expensed Cost divided by Total Consignment
Sales).
- iv. Gross Profit ($) -
Displays the profit calculated by subtracting the calculated
cost of all items sold from the consignment warehouse from
the total price of all items sold from the consignment warehouse
(Total Consignment Sales minus Consignment
Expensed Cost).
- VAT Tab

NOTE: The
information identified on the VAT tab is for reference
and custom reporting purposes only.
- Tax
A group box
- Registration
No - Identify
the registration number for the value added tax.
- Updated - Identify the date on which
the value added tax registration was issued or updated.
- Left-click
the drop down arrow
 in
the Updated field.
- The
date widget will appear.
- Left-click
the date that corresponds to the date on which the value
added tax registration was issued or updated.
- Left-click
the OK button.
- Valid
Until - Identify
the date on which the value added tax registration will expire.
- Left-click
the drop down arrow
 in
the Valid Until field.
- The
date widget will appear.
- Left-click
the date that corresponds to the date on which the value
added tax registration will expire.
- Left-click
the OK button.
- Comp/Dept/Div
Tab
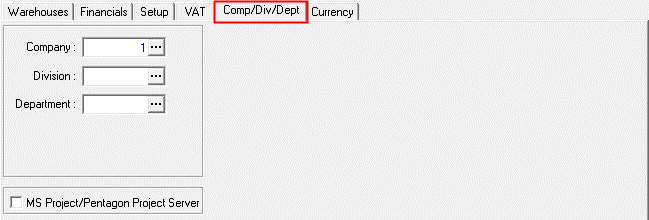
- Company -
Identify the company that manages the consignment warehouse.
- Left-click
the Company field containing the ellipses
 .
.
- The Company
List search window will appear.
- Select
the appropriate company (left-click the line within the search
screen and left-click OK; or double-click the
line within the search screen).
- Division -
Identify the division that manages the consignment warehouse (if
applicable).
- Left-click
the Division field containing the ellipses
 .
.
- The Division List For
Company [X] search window will appear.
- Select
the appropriate division (left-click the line within the search
screen and left-click OK; or double-click the
line within the search screen).
- Department -
Identify the department that manages the consignment warehouse
(if applicable).
- Left-click
the Department field containing the ellipses
 .
.
- The Department List For
Company [X] - Division [Y] search window will appear.
- Select
the appropriate department (left-click the line within the
search screen and left-click OK; or double-click
the line within the search screen).
- MS Project/Pentagon Project Server check box - As of build 8.5.54.104,
this field may be ignored.
- Currency
Tab

- Currency - Identify
the currency in which costs should be displayed for the consignment
warehouse.
NOTE: The
Multi-Currency module must be installed to utilize this functionality. Instructions
on setup and use of the Multi-Currency module may
be found in the procedure "Multi-Currency Module"
within the General System section of this manual.
- Tax
A - As of build
8.5.54.104, this field may be ignored.


