Purpose:
To
describe the steps for setting up shifts.
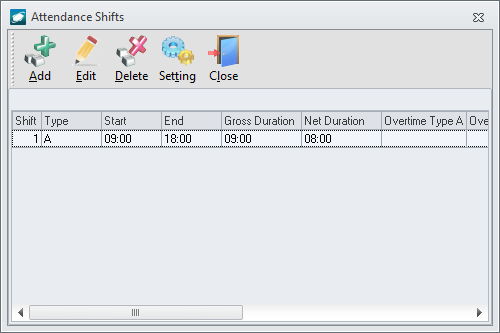
- Open
the Attendance Shifts window:

- From the main menu screen:
- Left-click the Admin
button; the Administration Menu
window will appear.
- Double-click ; the selection will expand.
- Double-click
; the selection will expand.
- Double-click
.
- From the ribbon:
- Left-click Administration.
- Left-click
the Users & Groups button.
- Go to .
- Left-click
.
- From the shortcut menu:
- Left-click Administration.
- Go
to .
- Go to .
- Left-click
.
- Left-click the
Add button on the Attendance
Shifts window toolbar.
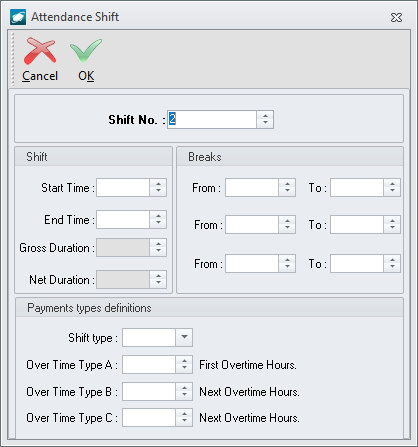
- The Attendance
Shift window will appear.

- The
Shift No.
field will be populated with the next available consecutive
shift number but may be modified as necessary.
- In the Start Time
field, enter the time at which the shift begins in 24-hour format.
- In the End Time
field, enter the time at which the shift begins in 24-hour format.
- In the Breaks
group box, identify up to three scheduled breaks.
NOTE: The
Gross Duration field displays the
duration of the shift (from start to finish) and the Net
Duration field displays the gross duration of the shift minus
the breaks identified in the Breaks
group box.
- In
the Payment Types Definitions group box, identify payment types
to properly classify labor on reports for keying into third party
payroll systems.
The Payment Types Definitions group
box is necessary for ETS-TA (link pending)
, but may be ignored relative to ETS.
- Left-click the OK
button on the Attendance Shift window
toolbar to save the record and close the window.
- The shift will appear in the grid.
- Left-click the Close
button on the Attendance Shifts window
toolbar to close the window.


